
I almost threw away a perfectly good computer.
My PC Health Check app told me both desktops were incompatible with Windows 11. So last July, I bought a new laptop and let those two machines collect dust for nearly a year — taking up space, doing nothing. I kept going back and forth: trash them, trade them in, or somehow bring them back to life?

Then I asked Gemini.
That one conversation changed everything. I learned how to upgrade to Windows 11 on a machine I thought was dead — without spending a single dollar. One of those “incompatible” computers is now running Windows 11 perfectly. The other one? I’ll tell you exactly why I let that one go.
If you’re in the same situation — sitting on an old PC that failed the compatibility check — read this before you do anything.
1. Step 0: Check Your PC Specs First
Before you do anything else, find out exactly what you’re working with.
Go to Settings → System → About. Copy everything you see — processor, RAM, system type, OS version — and paste it into a Word doc or Notes app. You’ll need this information to check compatibility and, if you want, to ask an AI to analyze your upgrade options the same way I did.
Here’s the prompt I used with Gemini:
I have two old desktop computers. Analyze their specs and tell me whether I should upgrade, trade in, or replace them — they need to be able to run Windows 11.”
Paste your specs right after that. The answer you get back might surprise you.
My first PC could actually be saved—and the key was TPM 2.0.
Gemini’s analysis brought an unexpected surprise. It turned out that my first computer (Intel Core i7-9700 with 16GB RAM) didn’t need any new hardware at all. I could upgrade it to Windows 11 simply by changing a single BIOS setting. But PC Health Check flagged it as incompatible.

Here is a breakdown of the essential requirements for Windows 11:
| Windows 11 Requirement | PC #2 Specs | Result |
|---|---|---|
| CPU | Intel Core i7-9700 (9th gen) | ✅ Fine |
| RAM | 16GB | ✅ Fine |
| 64-bit operating system | Windows 10 Pro 64-bit | ✅ Fine |
| TPM 2.0 | turned off by default in BIOS | ⚠️ Conditionally fine |
That’s it. One setting. That’s why the app said no.
It wasn’t a hardware limitation after all; it was simply a configuration issue. In that exact moment, I realized I had just saved the entire cost of buying a new computer—roughly $800 to $1,000!
When to Walk Away — My Second PC
My second desktop was a different story. Intel Xeon E3-1240 V2 — a 2012-era server processor. Gemini’s analysis was clear:
- CPU: Not on Microsoft’s supported list
- TPM 2.0: Not present on this generation, No fix available
- Graphics: No DirectX 12 support
Three deal-breakers. The upgrade options were:
- ① Option A — Hardware upgrade: Replace the CPU, motherboard, RAM, and GPU. That’s essentially buying a new computer. Not worth it.
- ② Option B — Sell or salvage parts: The Samsung 256GB SSD is still valuable. Pull it out, put it in an external enclosure, and reuse it. That’s the smart move.
- ③ Option C — Unofficial workaround: Tools like Rufus can bypass the TPM and CPU checks. But Microsoft could block this anytime, and security updates may not apply fully. I wouldn’t use this for anything involving personal data or banking.
I went with Option B. Sometimes the right call is knowing when to stop.
2. The BIOS Fix Nobody Mentions — TPM 2.0
Windows 11 requires TPM 2.0 (a security chip). On many 9th gen Intel boards, TPM 2.0 is built in — but turned off by default in BIOS.
Here’s how to turn it on:
Step 0: Enter BIOS
Fully shut down your PC. Power it back on and immediately tap Del or F2 repeatedly until a blue or black settings screen appears.

Step1: Switch to Advanced Mode
Most boards open in EZ (Easy) Mode first. Press F7 or click Advanced Mode.
Step2: Find PTT (Intel’s name for TPM 2.0) by manufacturer
Since my own computer is an ASUS, I’ll be sharing my step-by-step experience based on that brand. However, I’ve also included instructions for other major manufacturers for your reference.
① Path: Advanced → PCH-FW Configuration
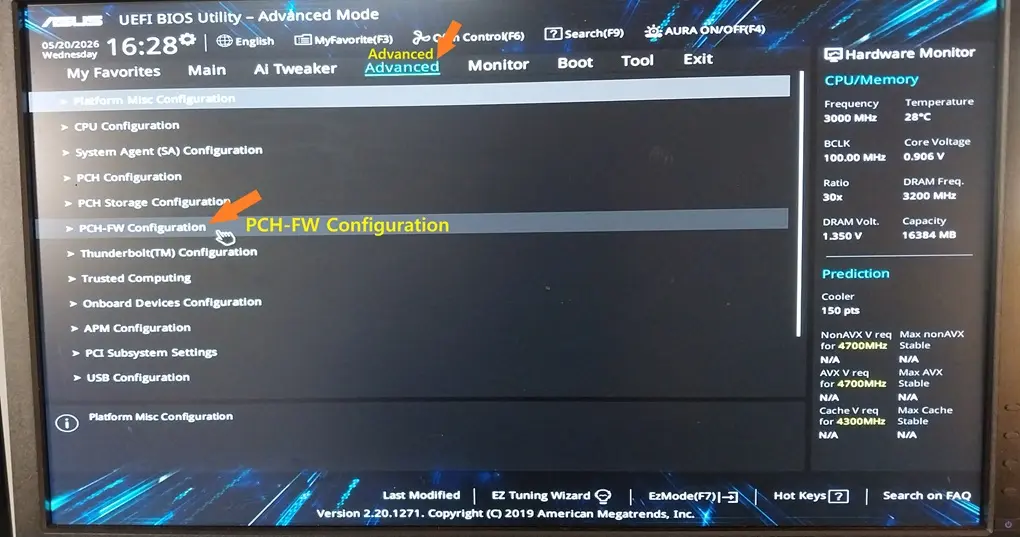
② Setting: TPM Device Selection → Firmware TPM

| Brand | Path | Setting |
|---|---|---|
| MSI | Settings → Security → Trusted Computing | TPM Device Selection → PTT |
| Gigabyte | Peripherals (or Settings) | Intel Platform Trust Technology → Enabled |
| ASRock | Advanced → CPU Configuration | Intel Platform Trust Technology → Enabled |
Step 3: Save and exit
Press F10, confirm with Yes. Your PC reboots. That’s it. Run Windows Update or the Installation Assistant again. You’ll pass the compatibility check this time.
3. How to Upgrade to Windows 11 for Free (2 Methods)
As of May 2026, the free upgrade from Windows 10 to Windows 11 is still available. Microsoft hasn’t set an end date — and with Windows 10 support already ended in October 2025, they’re actively encouraging users to move over.
Method 1: Windows Update (Easiest)
🎥 Video on updating from the settings menu
- Go to Settings → Update & Security → Windows Update
- Click Check for updates
- If your PC passes compatibility, you’ll see: “Windows 11 upgrade is ready”
- Click Download and install
- Accept the terms → let it run → click Restart now when prompted
Your files, apps, and activation key carry over automatically.
Method 2: Installation Assistant (Manual)
Use this if the banner doesn’t appear or you want to kick it off manually.
🎥 Video on updating using the Microsoft Installation Assistant
- Go to Microsoft’s Windows 11 Download page
- Under Windows 11 Installation Assistant, click Download Now
- Run the Tool and Check Compatibility: Launch the downloaded file. If a pop-up tells you that the ‘PC Health Check app‘ is required, click the provided link to install it. Then, open the app and click [Check Now] to verify that your hardware meets the requirements before proceeding.
- Run
Windows11InstallationAssistant.exe - Click Accept and Install
⌚Waiting for the updates to finish
The tool runs through 3 stages automatically: Download ➡️ Verify ➡️ Install. This process may take more than an hour.

6. Restart Your Computer: A 30-minute countdown will begin along with a ‘Ready to install’ message. Simply click the [Restart Now] button to begin the process.
7. Upgrade Complete: Your screen will turn blue as the installation percentage increases. After your system automatically reboots a few times, you’ll be welcomed by the clean, refreshed Windows 11 home screen.
Note: Don’t worry about your data! Your existing documents, photos, and programs will remain completely intact, and your Windows activation will automatically carry over.
4. What to Do If It Rolls Back to Windows 10
What happened to your PC is called an “Automatic Rollback.” The installation assistant reached 100%, rebooted your PC, but encountered a software conflict or driver error during the actual upgrade process. To protect your system and data, Windows safely reverted everything back to Windows 10.
To resolve this conflict and ensure a successful upgrade, please follow these steps:
Step 1: Remove Potential Blockers
- Disconnect External Devices: Unplug everything from your PC except for your monitor, keyboard, and mouse (e.g., external hard drives, USB flash drives, printers, or phone chargers). This prevents driver conflicts.
- Disable or Uninstall Third-Party Antivirus/Security Software: Programs like McAfee, Avast, Norton, or banking security software often mistake Windows upgrade processes for malicious activity and block them. Temporarily disable or uninstall them before upgrading.
Step 2: Fix System Errors & Clean Cache (Command Prompt)
If your current Windows 10 has corrupted system files, the upgrade will fail. Let’s scan and repair them.
- Type cmd in the Windows search bar on the bottom left.
- Right-click on Command Prompt from the results and select Run as administrator.
- In the black window, type the following command and press Enter (wait for it to finish):
- sfc /scannow
- Once completed, type the next command and press Enter:
- DISM /Online /Cleanup-Image /RestoreHealth
- After both scans are complete, close the window and Restart your computer.

Step 3: Perform a “Clean Boot” (Crucial Step)
This turns off all non-essential third-party background programs that might be blocking the installation.
- Press the Windows Key + R on your keyboard to open the Run dialog box.
- Type msconfig and press Enter.

3. Go to the Services tab at the top.
4. ⚠️ CRITICAL: Check the box at the bottom that says “Hide all Microsoft services.” (If you miss this, your PC may have trouble booting up).

5. After hiding the Microsoft services, click the “Disable all“ button on the right.
6. Next, go to the Startup tab at the top and click “Open Task Manager.“
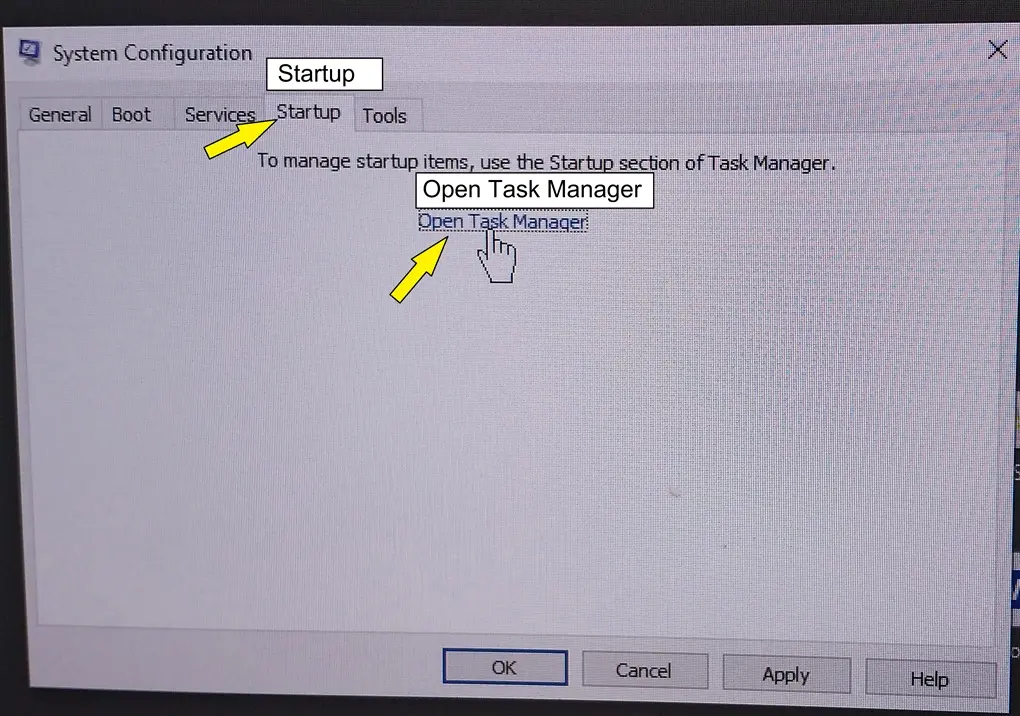
4. In Task Manager, look at the list of startup programs. Right-click on each one and select “Disable.“ (Do this for all of them). In my case, only two items in the Service list were “Enabled“, so I disabled only those and completed the process.

8. Close Task Manager, click Apply and OK on the System Configuration window, and Restart your computer.
5. After the Upgrade: The ASUS Q-Installer Popup
Once Windows 11 was installed, a popup appeared asking me to install ASUS Q-Installer.
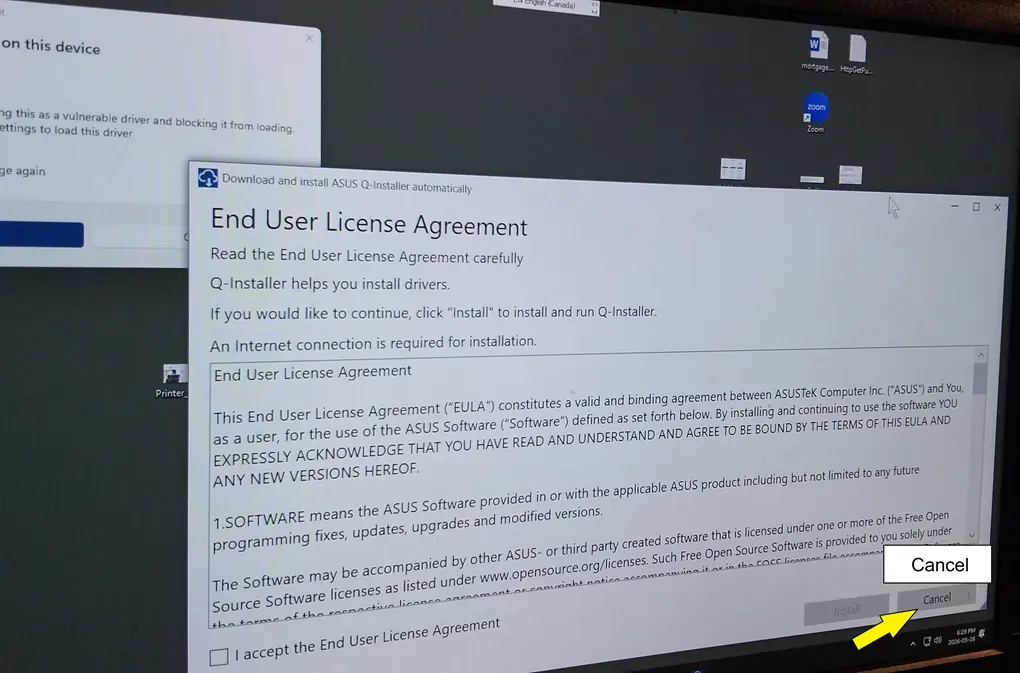
Don’t install it.
Windows 11 automatically installs the drivers your hardware needs through Windows Update. Q-Installer adds bloatware — extra utilities that run in the background and slow things down. Close the popup with Cancel.
Then go to Settings → Windows Update → Check for updates and let Windows handle the drivers.

If you also see a warning about Mslo64.sys — don’t worry. That’s Windows 11’s security feature (Core Isolation / Memory Integrity) blocking an old, vulnerable driver. Check Don’t show this message again and close it. That’s exactly what I did. Everything has worked fine since.
6. Retry the Upgrade
Your desktop might look slightly different when it boots up (this is normal for a clean boot).
- Go to your downloads folder, find
Windows11InstallationAssistant.exe. - Right-click on the file and select “Run as administrator.“
- Proceed with the installation again.
With background blockers and corrupted files cleared out, the installation should now successfully push through to Windows 11.
⚠️ Note: Once Windows 11 is successfully installed, you can open
msconfigagain, choose “Normal startup” under the General tab, and click OK to restore your normal background apps.

📌 Key Takeaways
- Don’t trash your old PC just because PC Health Check says it’s incompatible — the fix might be one BIOS setting away.
- TPM 2.0 (PTT) is built into most 9th gen Intel motherboards but is often disabled by default. Enable it in BIOS and you’re good to go.
- The Windows 11 free upgrade is still available as of May 2026.
- If installation rolls back, clean boot + run the assistant as administrator solves it most of the time.
- Skip the ASUS Q-Installer — Windows Update handles your drivers.
One More Thing
I almost paid for a new desktop because an app said my hardware wasn’t compatible. Turns out it was a single off switch in BIOS.
If your old PC failed the check, don’t assume the worst. Pull up your specs, run them through an AI, and find out exactly what you’re dealing with. You might be one setting away from a free upgrade.
Have questions about your specific setup? Drop them in the comments — I’ll do my best to help based on what I went through.
⚠️ Disclaimer:
This post is based on my personal experience and is provided for informational purposes only. System environments may vary, and I cannot be held responsible for any data loss, hardware damage, or system errors that may occur during the BIOS configuration or Windows upgrade process. Please ensure you back up all your important files and data before proceeding.
📈 Saved Money on Hardware? Now Save on Investment Fees!
Saving money by maintaining existing hardware is a great first step toward smart living. Take it further by eliminating unnecessary bank fees in Canada. Read my step-by-step experience on transferring RRSP assets from RBC Direct Investing to Questrade.
👉 Read: Step-by-Step Experience Moving RRSP from RBC to Questrade
🌏 한국어 버전으로 읽으시려면 [여기]를 클릭하세요.